
After last week's blog post asking you where you were, Spring, perhaps you are indeed showing your sun shining face...finally! We are just waiting for some sunshine, some warmer weather and the chance to get outside :-)
This time last year we were excited to make a start on our first garden. We had moved into our condo when we were married at the beginning of Autumn, and with Winter soon approaching we didn't actually do much on our balcony, apart from the bbq and a couple of chairs of course! So last Spring was the beginning of our gardening adventures in our 'garden'... or rather concrete space that we are actually very fortunate to have a large version of!
We knew we wanted some flowers, but with no flowerbed this wasn't our main priority. What we really wanted was stuff to eat! Herbs that we could use for cooking... real life edible produce rather than just flowers that looked pretty!!
We had the perfect item in storage (thanks to my grandmother-in-law for holding onto that in my 'room' for me!) and were super excited to convert this old CD player to a herb garden!
I had owned this CD rack since I moved to Canada when a neighbour in the first apartment I lived in was getting rid of it, but it was a perfect addition to my little basement apartment for some shelving. After moving into our condo we had no real need for it ... until now!


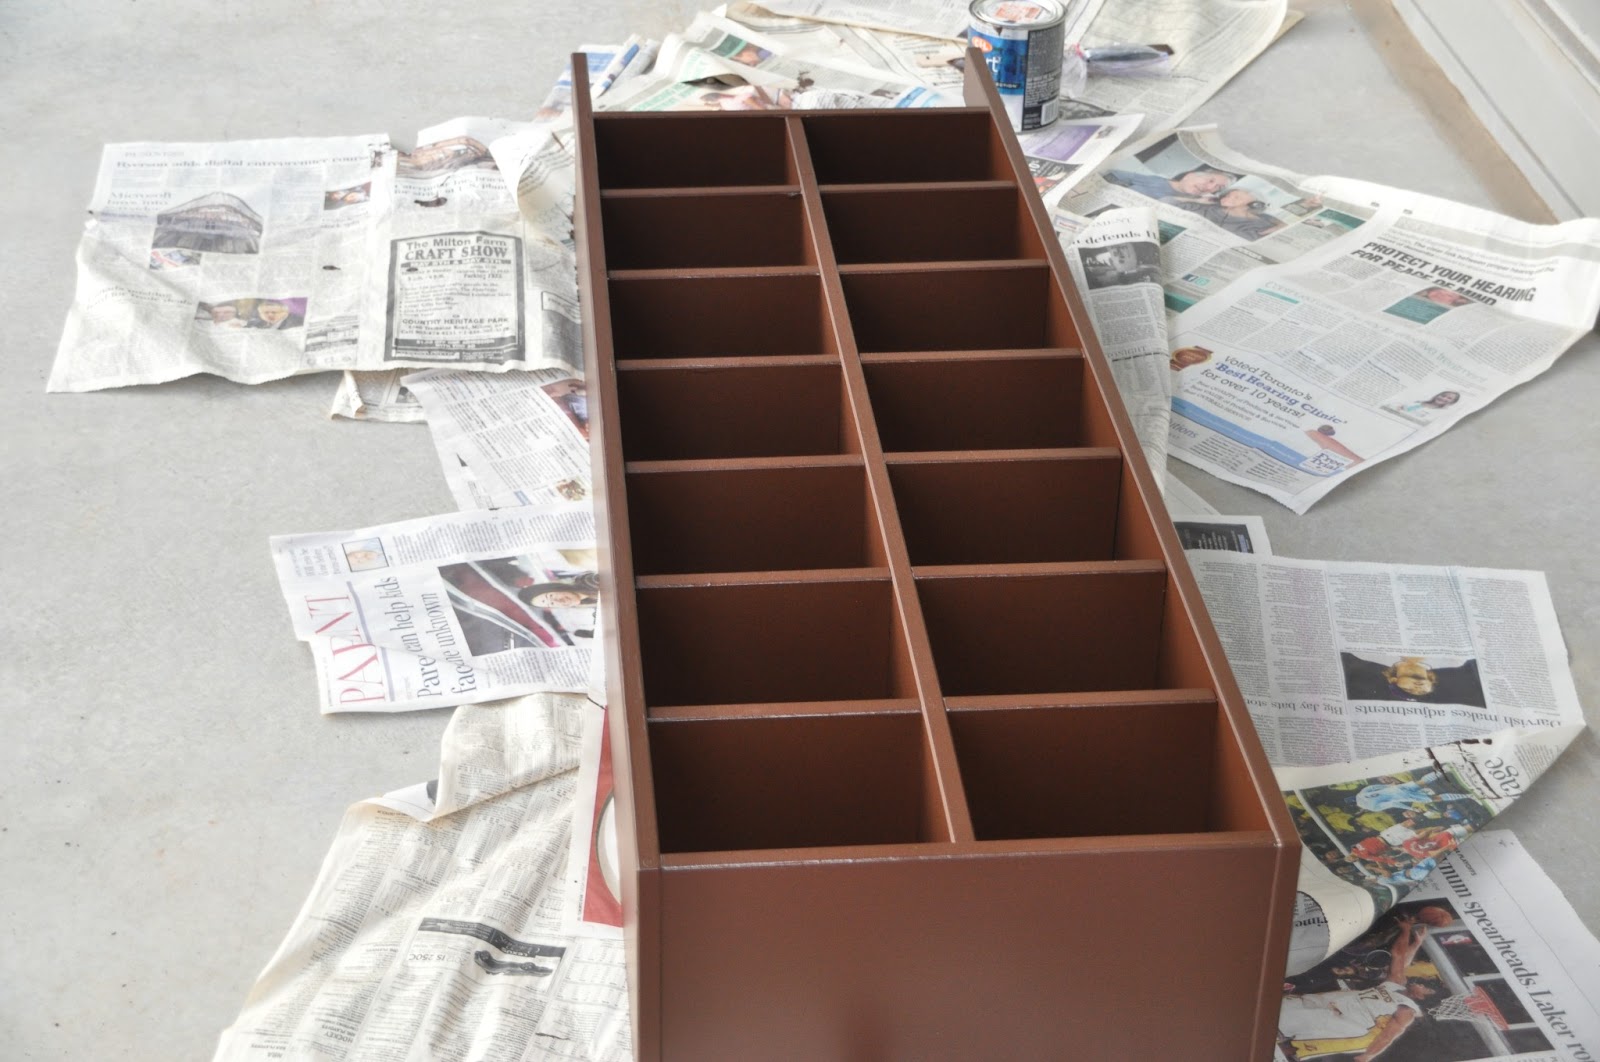

We chose a exterior waterproofing paint in a nice earthy brown colour that would match anything. I sanded off some of the blue paint, just to rough it up a little and then over the course of a couple of days I painted 3 coats of the brown. I made sure to get right into the inside corners to get a full seal everywhere.

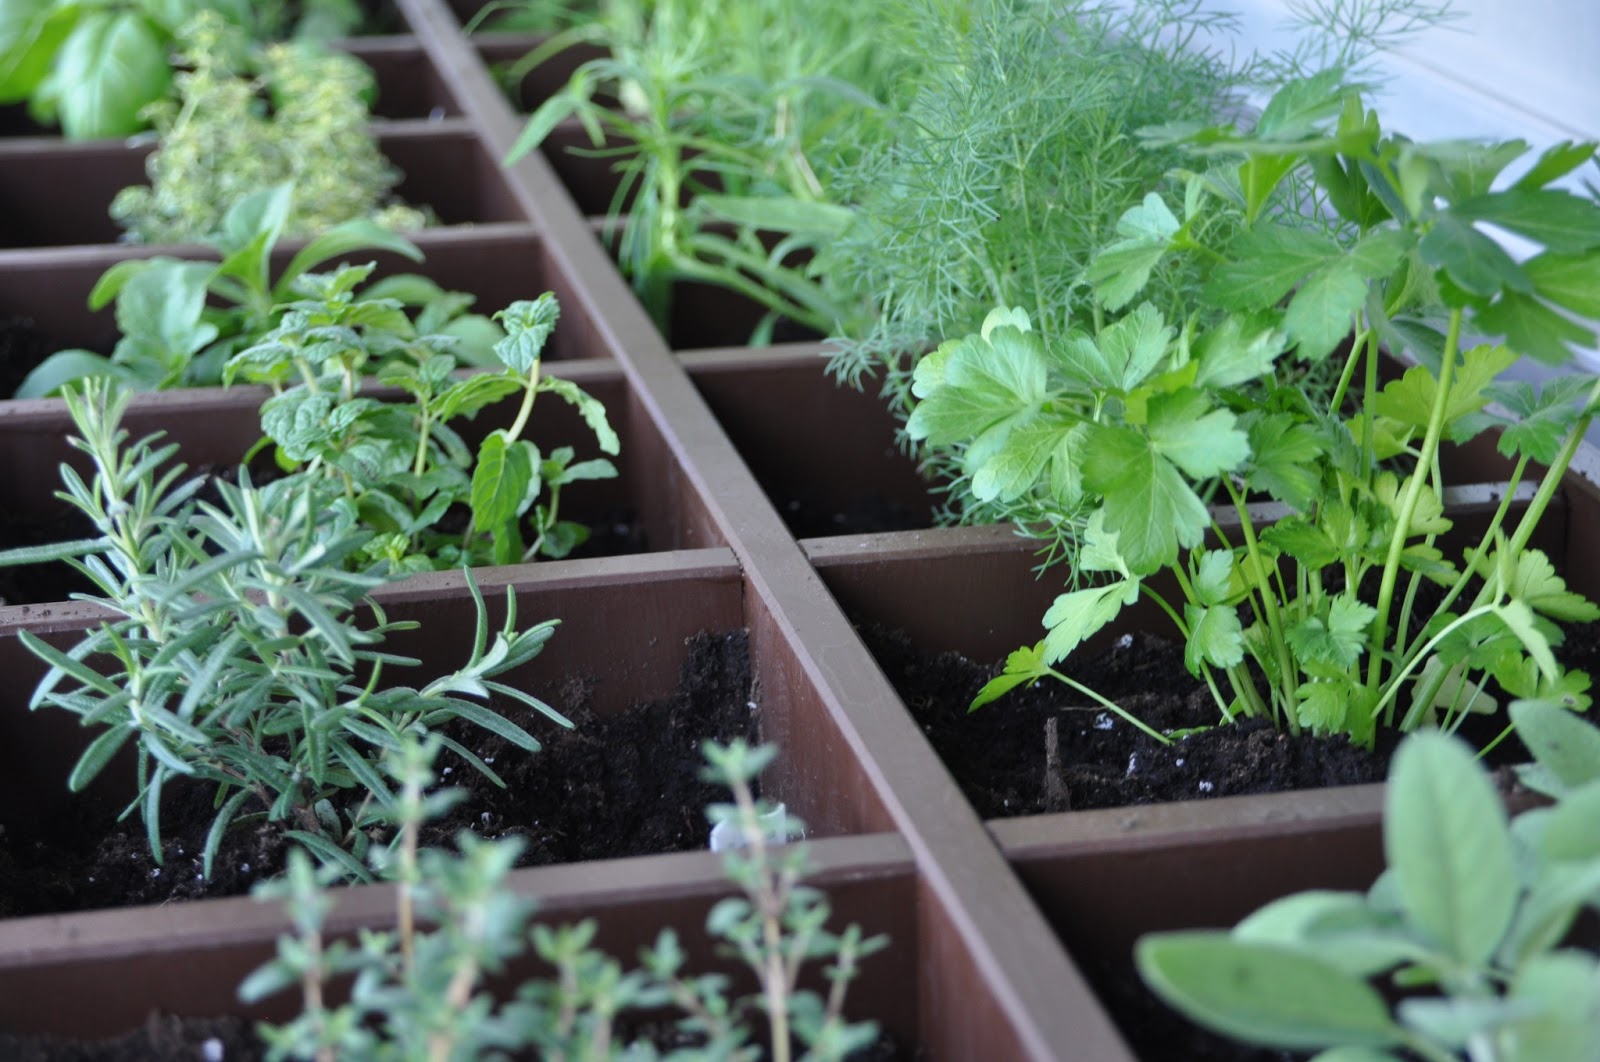
Once everything was dry we put gravel down at the bottom of each section, then soil, then the herbs themselves!
We actually planned it so that the nearest herbs to this edge (which is closest to the sliding door entrance) were the ones that needed the most watering, the middle ones only occasional watering, and the final ones hardly any at all! Although, our balcony is facing west and gets some SERIOUS late afternoon heat in the Summer months so we did have to make sure the English herbs in particular weren't drying out!

We planted:
Parsley, Sage, Rosemary, Thyme (♫ Scarborough Fair in anyone's heads?!)... Dill, Stevia (we had big ideas for iced tea and baking substitutes!)... Tarragon, Mint (used in my Summer Citrus Cake)... Basil, Chives, Lemon Thyme, Cilantro and 2 Strawberry plants.
.JPG)
So whilst the weather is still not quite good enough to grow these again yet, we had a lot of fun with this DIY Herb Garden project last year and the CD rack is still out on our balcony looking good, just waiting for it's herbs back!
.JPG)
Bring on Summer!
Now, what to do with all the old cds! Great reuse.
ReplyDeleteThanks so much Pam! I know, storage switching spaces but in our space this works perfectly :-D
DeleteWhat a great idea! I love it. The sections are the perfect size to do this with. I love that you are so creative and willing to share! I would not have come up with this great idea. I need to dig one up now so I can use it in my backyard :) I would love for you to share this on Thursday @ Great Idea Thursday http://ahandfulofeverything.blogspot.com. Krista
ReplyDeleteHi Krista,
DeleteThanks so much for your super kind comment! I'm so glad you like our DIY herb garden :-) Thanks for inviting me over to your blog, I'll be linking up for sure!
Thanks!
Hannah ♫
Hello! I'm stopping by from the Marvelous Monday Link up - and this is just so clever - I love it! :)
ReplyDeleteYey thanks so much Angela! So great to have you here :-)
DeleteI love this! This is such a great idea! Pinned it for later! Julia @ www.juliakendrick.com
ReplyDeleteThanks so much Julia! Great that you could come by and see my project! Thanks for pinning :-)
DeleteFabulous idea! Great re-purpose for cd cabinet. I love it!
ReplyDeletePeace,
Linda at The French Hens Nest
Thanks so much Linda :-D
DeleteI love it! This is such a great idea!
ReplyDeleteThanks for stopping by, so glad you like it :-D
DeleteHi! Hopped over from Marvelous Mondays, and I love this idea! It's really clever to reuse what you already have, and the rack doesn't take up nearly as much space as numerous containers would. Genius!
ReplyDeleteHi Danni, thanks so much for stopping by and I'm so happy you love this idea :-) It was so fun to make and yes you're right, we wouldn't have room on our balcony for individual pots for all of those herbs!
DeleteOh, this is such a neat idea and way to reuse and repurpose! :)
ReplyDeleteThank you for sharing at Sweet & Savoury Sundays this week!
Thanks so much! Great to have you here, glad you like the project :-)
Deletevisiting from handmade tuesday. this is so fantastic
ReplyDeleteYey thanks so much!! Great to have you stop by!
DeleteThis is SO cool. I need to look for an old CD rack!
ReplyDeleteYes! I hope you can find one :-D Do send me a link to your project if you find one and make it!!
DeleteGreat way to turn something you don't need into something useful. Thanks for sharing & linking to the Craftastic Monday party at Sew Can Do!
ReplyDeleteThanks so much Cheryl! That's exactly what we thought, it's perfect now on our balcony compared to in storage!
DeleteThat is a great idea! I love repurposing things that would just end up in the landfill otherwise. I'm anxiously waiting for summer too! Thank you for sharing it at to What We Accomplished Wednesdays. Have a lovely week!
ReplyDeleteHugs,
Deborah
Hi Deborah,
DeleteThanks for stopping by and checking our our herb garden DIY project! So glad you like it :-D
Hannah
Great re-purposing!
ReplyDeleteThanks so much :-)
DeleteWhat an awesome idea! If you get a chance, please link up to my linky party: http://suburbsmama.blogspot.com/2013/04/sunday-linky-party-3.html
ReplyDeleteThank you!! I will for sure visit your blog and link up, thank you for the invite! Great to have you here checking out my projects :-)
DeleteAwesome idea. Pinned!!
ReplyDeleteYey thanks so much :-D
DeleteThanks for stopping by my blog today. I love this herb garden. Such a great idea. I will be pinning it to my garden board!
ReplyDeleteWow great, thanks Jessica! I loved those stones, and I love that lots of projects right now are so Spring/Summery! Garden ideas are everywhere! :-) Thanks for stopping by!
DeleteWhat a great upcycle!!
ReplyDeleteThank you so much for linking up with Much Ado About Monday at Huckleberry Love. We hope you come back next week and share what else you've been up to!
Karla
www.huckleberrylove.com
Thanks so much Karla! It was great to link up, and I'll for sure be back next week :-D
DeleteLove love love this Hanna! Thanks for linking up at Create & Inspire - sharing this on A Night Owl's Facebook page!
ReplyDeleteThanks so much Kimberly!! That's so great :-) Thanks for checking this out!
DeleteThis is such a great idea. It would make the raised bed or square foot gardens so dang easy. Thanks for linking up at Whatever Goes Wednesday! We'll be featuring your idea tomorrow, so come back and visit if you have a chance!
ReplyDeleteYey thank you Miranda! It definitely keeps it compact and simple :-) Thank you SO MUCH for featuring this on your blog, it was great to see it up there on your fantastic blog with all of the other great projects, thanks!!
DeleteBrilliant!!!! On the hunt for an old rack. Thanks for the great idea.
ReplyDeleteOh you are so welcome! I hope you can find one :-) Do send a link to your project if you make one too!!
DeleteThis is so clever! And a great tutorial - I'll be on the lookout for a cd shelf now-so glad I stumbled on your site (the name is a riot!!
ReplyDeleteAh thanks so much Christina! Hope you find one and get to make one too!
DeleteWhat a great idea! Thanks so much for sharing it at The Busy Bee's (Thursday link party) We are so happy to have you join us!
ReplyDeleteHave a great day!
Joye & Myrna
The Busy Bee's
Thanks so much! And thank you for coming by to check out our project :-)
DeleteThank you for sharing your DIY CD rack at A Crafty Soiree! I've featured your project in the week's party post. It will be up at midnight EST tonight and I hope you'll come by to see it and share more of your projects.
ReplyDeleteWahoo thank you so much Katie! Amazing to be featured on your fantastic blog :-) Yey thank you!
DeleteHannah
I am a sucker for recycled crafts, thank you so much for sharing this on Tutorial Thursdays Linky Party. This is my favourite link of the week and as such I will be featuring your post tomorrow. Please come by to grab your featured button :) I can't wait to see what you will be sharing this week.
ReplyDeletex
Natalie
www.marigoldsloft.blogspot.com
WOW amazing, thank you so much Natalie! Amazing to be featured on your great blog! So exciting!!
DeleteLovely. However a couple of "things". If the gravel isn't enough drainage, 1/2" holes drilled in each section and weed cloth or window screening or coffee filters over each hole would be great. Also I'm a little concerned with exterior paint and edibles. Painting the exterior is fine, but on the interior I'd choose a product such as Eco Wood Treatment or Tung Oil would be better choices. Again, this is very lovely.
ReplyDeleteThanks for stopping by Kim!
DeleteThat's a great idea, I haven't bought an actual CD in years thanks to iTunes and I like the brown so much better. I had to look twice because I thought it was wood.
ReplyDeleteLindsay
Hi Lindsay, thanks so much for stopping by - so glad you like it :-D The brown is wayyyyyy better than the blue I agree, gives it a better garden feel too! Thanks for checking it out :-)
DeleteThis is such a smart idea! Thank you so much for stopping by my blog the other day. Our Link Party Starts tonight at 10 Est. I would love to have you stop by and link up your favorite creations!
ReplyDeleteMelissa
redflycreations.com
Thanks so much for checking this out Melissa!! And for the invite :-)
DeleteHi there! Stopping by after seeing your project at Just Us Four's 4/19 linky party. This is a great way for those to garden who don't have the adequate land - and a great way to upcycle an obsolete item in good condition! Take care and thanks for sharing such a great idea!
ReplyDeleteSherryO
www.WhoNeedsACape.com
Thanks so much Sherry! Great to have you here :-)
DeleteThis comment has been removed by a blog administrator.
ReplyDeleteThis comment has been removed by a blog administrator.
ReplyDeleteThis comment has been removed by a blog administrator.
ReplyDeleteThis comment has been removed by a blog administrator.
ReplyDelete